Selfmedicate - Antidote’s Development Environment
If you want to contribute some lessons, you’ll probably want to find a way to run them locally yourself before opening a pull request. Or maybe you’re looking to show some automation demos in an environment that doesn’t have internet access (hello federal folks). If any of this describes you, you’ve come to the right place.
The antidote project is meant to run on top of Kubernetes. Not only does this provide a suitable deployment environment for the Antidote platform itself, it also allows us to easily spin up additional compute resources for running the lessons themselves. To replicate the production environment at a smaller scale, such as on a laptop, we use “minikube”. This is a single-node Kubernetes cluster that is fairly well-automated. This means you can do things like run demos of Antidote lessons offline, or use this as your development environment for building new lessons.
The selfmedicate tool is a set of scripts that use minikube to deploy a full functioning Antidote deployment on your local machine.
Warning
Currently, selfmedicate only supports mac and linux. If you want to run this on Windows, we recommend executing these scripts from within a linux virtual machine, or within Windows WSL.
Warning
The selfmedicate script is designed to make it easy to configure a local minikube environment
with everything related to Antidote installed on top. However, you’ll always be well-served by
becoming familiar with minikube itself so that you are more able to troubleshoot the environment
when things go wrong. Keep a bookmark to the minikube docs handy, just in case.
Install and Configure Dependencies
The development environment runs within a virtual machine, so you’ll need a hypervisor. We recommend Virtualbox as it is widely supported across operating systems as well as the automation we’ll use to get everything spun up on top of it.
Next, you’ll need minikube. This is by far the easiest way to get a working instance of Kubernetes running on your laptop. Follow the installation instructions to install, but do not start minikube.
Warning
The currently supported version of minikube is v0.34.1. Please install this version specifically. You may encounter issues with other versions.
Note
The selfmedicate script starts a minikube VM with 8GB of RAM and 4 vCPUs by default. While this isn’t a strict
requirement, it’s a highly advised minimum. Depending on the lessons you start, it can require quite a bit of system
resources, especially if you start multiple lessons in parallel.
Starting the Environment
All of the scripts and kubernetes manifests for running Antidote within minikube are located in the antidote-selfmedicate repository. Clone and enter this repository:
git clone https://github.com/nre-learning/antidote-selfmedicate && cd antidote-selfmedicate/
Note
By default, the selfmedicate script will look at the relative path ../antidote for
your lesson directory, and automatically share those files to the development environment.
If this location doesn’t exist, either place the appropriate repository there, or edit the
LESSON_DIRECTORY variable at the top of selfmedicate.sh.
Within this repo, the selfmedicate.sh script is our one-stop shop for managing the development environment. This script
interacts with minikube for us, so we don’t have to. Only in rare circumstances, such as troubleshooting problems, should
you have to interact directly with minikube. This script has several subcommands:
./selfmedicate.sh -h
Usage: selfmedicate.sh <subcommand> [options]
Subcommands:
    start    Start local instance of Antidote
    reload   Reload Antidote components
    stop     Stop local instance of Antidote
    resume   Resume stopped Antidote instance

options:
-h, --help                show brief help
To initially start the selfmedicate environment, use the start subcommand, like so:
./selfmedicate.sh start
The output of this script should be fairly descriptive, but a high-level overview of the four tasks accomplished
by the selfmedicate script in this stage is as follows:
minikubeis instructed to start a Kubernetes cluster with a variety of optional arguments that are necessary to properly run the Antidote platform- Once a basic Kubernetes cluster is online, some additional infrastructure elements are installed. These include things like Multus and Weave, to enable the advanced networking needed by lessons.
- Platform elements like
syringeandantidote-webare installed onto the minikube instance. - Common and large images, like the
vqfxandutilityimages are pre-emptively downloaded to the minikube instance, so that you don’t have to wait for these to download when you try to spin up a lesson. - Once all the above is done, the script will ask for your sudo password so it can automatically add an entry
to
/etc/hostsfor you. Once this is done, you should be able to access the environment at the URL shown.
Warning
Each of these steps are performed in sequence, and will wait for everything to finish before moving on to the
next step. This script is designed to do as much work as possible up-front, so that your development experience
can be as positive as possible. As a result, the first time you run this command can take some time. BE PATIENT.
Also note that if you destroy your minikube instance, you’ll need to redo all of the above. If you want to just
temporarily pause your environment, see the section below on the stop and resume subcommands.
The below screenshot shows this command in action, for your reference. You should see more or less the same thing on your environment.
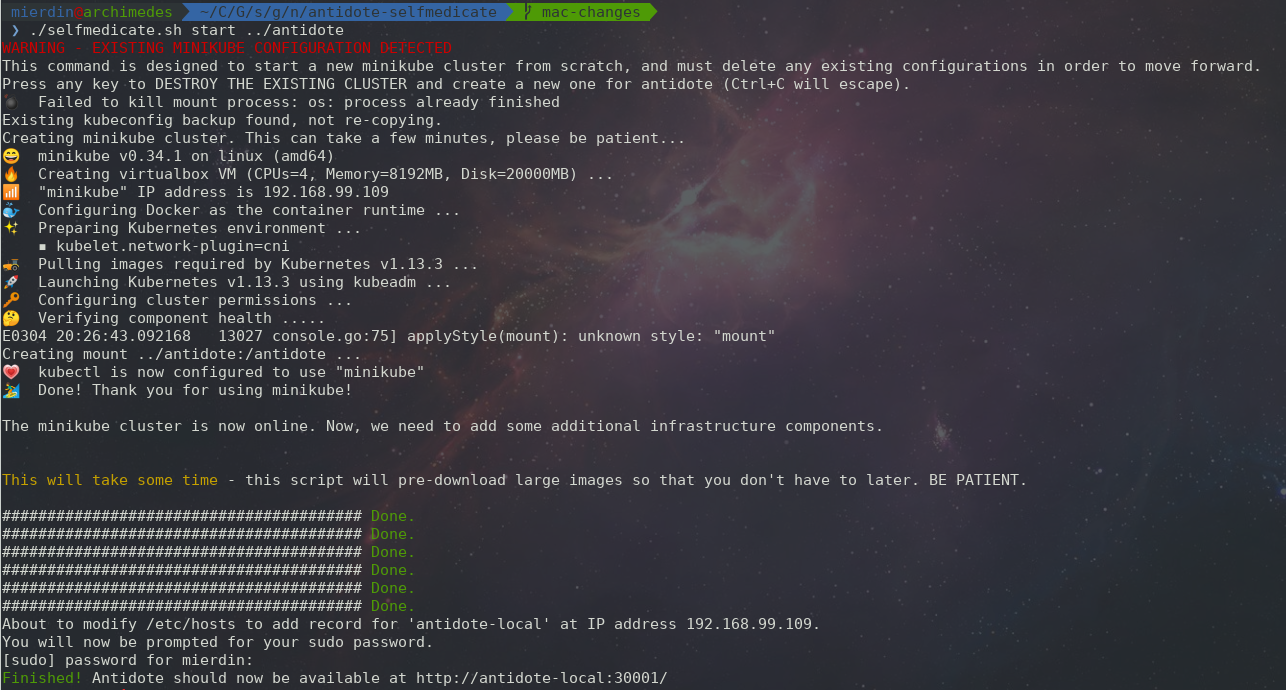
Once this is done, the environment should be ready to access at the URL shown by the script.
Iterating on Lessons
One of the biggest use cases for running selfmedicate is to provide a local instance of the antidote platform for
building and testing curriculum contributions. As was briefly mentioned in the start section above, the selfmedicate
script takes care of mapping the files on your local filesystem into minikube and again into the Syringe pod to ensure
it sees the lessons you’re working on.
This means you can work on lessons all on your local machine without having to bother editing environment variables or committing your content to a Git repository.
Once you have a working antidote installation according to the previous section, you’ll notice that the web portal shows the lessons
as they existed when you initially started the platform. If you want to apply any changes you’ve made locally, you need to run the
reload subcommand of the selfmedicate script:
./selfmedicate.sh reload
This command will take care of restarting Syringe, so that it can reload the content you’ve changed on your filesystem.
Pausing and Resuming Environment
As mentioned above, if you destroy the minikube environment, you’ll need to perform the start command all over again.
However, it would be nice to be able to stop the environment temporarily, and resume later without installing everything
over again from scratch.
Fortunately, the stop and resume subcommands do just this for us. To stop/pause the environment, run:
./selfmedicate.sh stop
To resume, run:
./selfmedicate.sh resume
The resume command is important to run, since this re-executes minikube with the optional arguments needed by Antidote,
so make sure to use this, rather than trying to use minikube start directly.
Troubleshooting Self-Medicate
The vast majority of all setup activities are performed by the selfmedicate script. The idea is that this script shoulders
the burden of downloading all the appropriate software and building is so that you can quickly get to focusing on lesson content.
However, issues can still happen. This section is meant to direct you towards the right next steps should something go wrong and you need to intervene directly.
Note
If your issue isn’t covered below, please open an issue on the selfmedicate repository.
Cannot connect to the Web Front-End
It’s likely that the pods for running the Antidote platform aren’t running yet. Try getting the current pods:
~$ kubectl get pods
NAME                                        READY   STATUS    RESTARTS   AGE
antidote-web-99c6b9d8d-pj55w                2/2     Running   0          12d
nginx-ingress-controller-694479667b-v64sm   1/1     Running   0          12d
syringe-fbc65bdf5-zf4l4                     1/1     Running   4          12d
You should see something similar to the above. The exact pod names will be different, but you should see the same numbers under
the READY column, and all entries under the STATUS column should read Running as above.
In some cases the STATUS column may read ContainerCreating. In this case, it’s likely that the images for each pod
is still being downloaded to your machine. You can verify this by “describing” the pod that’s not Ready yet:
kubectl describe pods -n=kube-system kube-multus-ds-amd64-ddxqc
Name:               kube-multus-ds-amd64-ddxqc
....truncated....
Events:
Type    Reason     Age   From               Message
----    ------     ----  ----               -------
Normal  Scheduled  19s   default-scheduler  Successfully assigned kube-system/kube-multus-ds-amd64-ddxqc to minikube
Normal  Pulling    17s   kubelet, minikube  pulling image "nfvpe/multus:latest"
In this example, we’re still waiting for the image to download - the most recent event indicates that the image is being pulled.
The selfmedicate.sh script has some built-in logic to wait for these downloads to finish before moving to the next step,
but in case that doesn’t work, this can help you understand what’s going on behind the scenes.
If you’re seeing something else, it’s likely that something is truly broken, and you likely won’t be able to get the environment working without some kind of intervention. Please open an issue on the antidote-selfmedicate repository with a full description of what you’re seeing.
Lesson Times Out While Loading
Let’s say you’ve managed to get into the web front-end, and you’re able to navigate to a lesson, but the lesson just hangs forever at the loading screen. Eventually you’ll see some kind of error message that indicates the lesson timed out while trying to start.
This can have a number of causes, but one of the most common is that the images used in a lesson failed to download within the configured timeout window. This isn’t totally uncommon, since the images tend to be fairly large, and on some internet connections, this can take some time.
There are a few things you can try. For instance, kubectl describe pods <pod name>, as used in the previous section,
can tell you if a given pod is still downloading an image.
We can also use the minikube ssh command to send commands into the minikube VM and see the results. For instance, to
check the list of docker images that have been successfully pulled:
Note
minikube ssh docker image list
This is the same as running docker image list, but it’s done from inside the minikube VM for you. Similarly, if you wanted
to manually pull an image ahead of time, you could run minikube ssh docker image pull <image>.
Note
The selfmedicate script downloads the most common images in advance to try to reduce the likelihood of this issue, and to
generally improve the responsiveness of the local environment. However, it can’t do this for all possible images you might want
to use. If you know you’ll use a particular image commonly, consider adding it to the selfmedicate script, or manually
pulling it within the minikube environment ahead of time.
Validating Lesson Content
Syringe, the back-end orchestrator of the Antidote platform, comes with a command-line utility called syrctl. One of the things
syrctl can do for us is validate lesson content to make sure it has all of the basics to work properly. To run this command,
you can compile the syrctl binary yourself from the Syringe repo, or you can execute the pre-built docker container:
docker run -v .:/antidote antidotelabs/syringe syrctl validate
In the very near future, syrctl will be added to the CI pipeline for Antidote so that you know in your PR if there’s any issues.